
Guest post: Stitching together the Twitter Kit in the Fabric SDK
Tuesday, 11 August 2015
The Android platform has missed having an official Twitter SDK for years. As Android developers, we’ve had to rely on third party libraries such as twitter4j to build our various Twitter integrations.
Twitter4j is just a 3rd-party wrapper around all the commands in Twitter REST API. This means that if Twitter is not part of your core user experience, it’s actually quite heavy and adds 2,500+ methods to the method count of your project. If you then add some more third-party libraries to your project, you can quickly exceed the dex count limit in Android. This means the next time a product owner comes over to your desk saying, “Please, can you add this new analytics or advertising SDK to the app?” you have to figure out what other projects can be dropped or try to get multidex builds to work on older Android phones. And because it’s such a thin veneer over the API, you have to implement most of the Twitter business logic around authentication tokens.
This all changed last year when the new Fabric SDK was announced. For most of us in the developer community, the change meant we needed to migrate to Fabric to ensure we got the latest version of Crashlytics (which has quickly become my crash reporting tool of choice for both Android and iOS). Otherwise, unless you were also using Twitter’s MoPub advertising framework, its impact wasn’t as direct.
But the chance of reducing the method count, seamlessly integrating Twitter login, easily implementing your own Tweet UI and having an officially maintained SDK mean that the Twitter Kit is also worth looking into.
Migrating from the old Crashlytics SDK to the new Fabric SDK was remarkably simple. First, you need to change your old repository in both places in the build.gradle file from
maven { url 'http://download.crashlytics.com/maven' }
to
maven { url 'https://maven.fabric.io/public' }
If your gradle file is still pointing to mavenCentral(), it’s also a good idea to migrate that to jcenter(). You’ll then need to change the dependency fromclasspath 'com.crashlytics.tools.gradle:crashlytics-gradle:1.+'
to
classpath 'io.fabric.tools:gradle:1.+'
And then apply the fabric plugin after the android plugin (e.g.):apply plugin: 'com.android.application'
// Must occur after the Android plugin
apply plugin: 'io.fabric'
Finally, in the build script, change the compile fromcompile 'com.crashlytics.android:crashlytics:1.+'
to
compile('com.crashlytics.sdk.android:crashlytics:2.4.0@aar') {
transitive = true;
}
Where the 2.4.0 is the latest KIT_VERSION from Fabric at the time of writing
That’s the build tools updated. Now you need to rename crashlytics.properties to fabric.properties, include both the apiKey and apiSecret for your app’s Crashlytics account, and then in your Application class modify:Crashlytics.start(this);
to
Fabric.with(this, new Crashlytics());
And that’s it! All your other Crashlytics calls can stay the same and everything just works.
Now let’s look at Twitter. Here at Depop we don’t (yet) support login with Twitter but we do allow users to connect to Twitter so they can Tweet when adding a new item for sale in their shop. We do this under the settings screen like this:
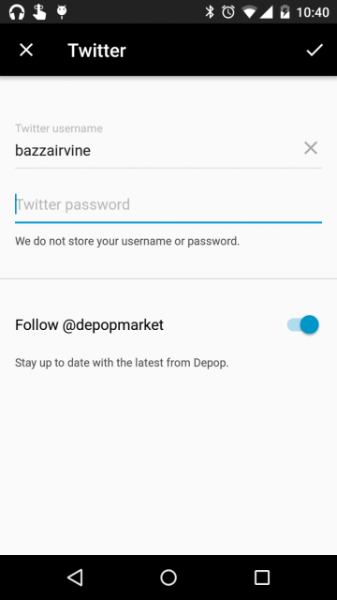
So our existing app looks a bit clunky. Even though I’m already logged into the Twitter app, I have to type in my Twitter password. And despite saying that Depop doesn’t store the username, I can see my pre-populated username. This is because we pull this information from the Account Manager on the phone — not from the Depop app.
We also present a switch control, which means that if I connect without setting this off then I’ll automatically follow @depopmarket on Twitter.
So now I want to change this setup. First, let’s update our build scripts to allow us to use the Twitter Kit. One of the advantages of the Fabric SDK is that it’s modular so I only need to include the kits I want to use, and therefore don’t add methods I don’t need. Since I’ve already added the Fabric SDK, I know just need to add this to the imported libraries.
compile('com.twitter.sdk.android:twitter-core:1.3.1@aar') {
transitive = true;
}
Then in the Application class again I just need to update it to include Twitter.TwitterAuthConfig authConfig = new TwitterAuthConfig(BuildConfig.TWITTER_CONSUMER_KEY, BuildConfig.TWITTER_CONSUMER_SECRET);
Fabric.with(this, new Crashlytics(), new TwitterCore(authConfig));
If you’re not using Crashlytics, then you don’t need that part of the statement. The with command will take a list of whatever kits I want to use. You can see that I’ve added my twitter keys to the build config too, but you can use getString or even the direct values for your Twitter app here that you were previously using with twitter4j.
The Log in with Twitter section of the installation guide shows me that the easiest way to connect to Twitter is to create a new TwitterLoginButton and add it to the Activity’s layout file. I also have to add a callback to the Button when the view is created. This callback gives me either a TwitterSession or a TwitterException error back — provided I remember to update the button with the Activity result.
When I press this button, I see what permissions I’m requesting and that it’s trying to connect to my Twitter account:
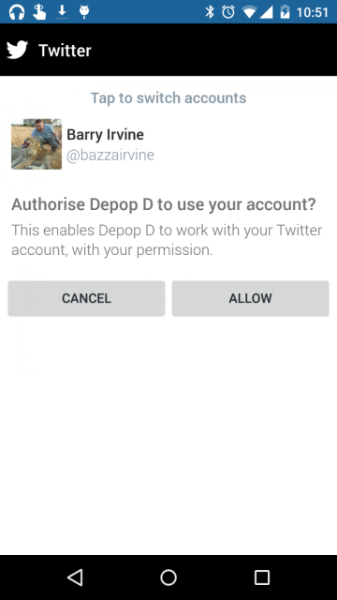
That looks better. I know that Depop (the D is for the debug build that I’m running) wants to work with my Twitter account. Since I’m already logged in on the Twitter app, I just need to press ALLOW.
The callback on my button now returns a TwitterSession. To easily integrate this with our existing code, I convert this to and from JSON using a GsonBuilder. I can also drop all the references to the our old TwitterAccessToken class since all that information is contained in the TwitterSession.
I was a bit surprised that the callback doesn’t change the button state to logout instead of sign in but, as we’ll see later, I’m not planning on keeping it anyway.
So now I’ve got everything working better than it was before, but what happens if I don’t have the Twitter app on my device? I quickly uninstall Twitter, run the Depop app and I click on the button. Now instead of seeing my Twitter profile directly, I get a web form showing the Depop Twitter app and I can enter the username and password again. If I’d already been logged into Twitter using Chrome on my device, it can also save these details. Once I log in, it’s pretty much the same flow but when I click the Authorise app button this time I get a big crash!
Further investigation shows that I’m getting an empty TwitterSession object back. The reason for this is that I completely ignored the Callback URL in the Configure Your Twitter App part of the installation guide. A quick tweak and everything is working correctly. Now I can use single sign on or a web login.
But the product owner still isn’t happy. Now I have a screen showing just a login button — why doesn’t starting that activity just go straight to the authorise screen? I’ve also lost the ability to get the user to follow Depop on Twitter. And if I display the authorise screen but press cancel, I get an error message displayed.
Looking through the TwitterLoginButton class, it turns out I need to get a new TwitterAuthClient() and authorize it. This will display the SSO login screen or the webform appropriately. I just need to pass in a callback as before and in my onActivityResult method I do this:
if (requestCode == TwitterAuthConfig.DEFAULT_AUTH_REQUEST_CODE) {
getTwitterAuthClient().onActivityResult(requestCode, resultCode, data);
}
Now what about the error I’m displaying when the user cancels? Twitter still returns an exception in this case but it doesn’t say that it was a cancelled exception. I need to store the resultCode that I get back in the onActivityResult, then in my failure callback I can say:
@Override
public void failure(TwitterException e) {
if (twitterResultCode == RESULT_CANCELED) {
//Twitter still returns an exception even if the user cancels the action. In this case we just want to close our activity too.
finish();} else {… do something with the error
}
And finish my activity.
Now, what about that follow option? A quick look through the SDK documents shows that following other users friendship is not supported. I can, however, define my own API client around any of the REST API commands using retrofit. That looks like this:
public class DepopTwitterApiClient extends TwitterApiClient {
public DepopTwitterApiClient(final TwitterSession session) {
super(session);
}
/**
* Provide CustomService with defined endpoints
*/
public CustomService getCustomService() {
return getService(CustomService.class);
}
interface CustomService {
@FormUrlEncoded
@POST("/1.1/friendships/create.json")
void create(@Field("screen_name") final String screenName, @Field("follow") final boolean follow, Callback<User> cb);
}
}
I can now create a dialog that appears when the user first logs in to ask them if they want to also follow @depopmarket on Twitter. If they say yes, I simply invoke my new command as follows:
new DepopTwitterApiClient(data.result).getCustomService().create("@depopmarket", true, new Callback<User>() { ...
One gotcha here is that the call will normally return OK almost straightaway but the request is carried out asynchronously, so if you look at the Twitter account for that user, they may not immediately be following @depopmarket.
And that’s it! Twitter is connected and Crashlytics is upgraded to Fabric with a big saving on the method count and an improved UX.
Did someone say … cookies?
X and its partners use cookies to provide you with a better, safer and
faster service and to support our business. Some cookies are necessary to use
our services, improve our services, and make sure they work properly.
Show more about your choices.